Saturday, July 28, 2012

Off To The Fair

The original Belted Star
 As I mentioned earlier, I signed up for the Quilt Block Competition at the Iowa State Fair.  After much hemming and hawing, I decided on the Belted Star pattern for my 9 inch block.  I have never sewn a block so carefully in my life before.  When I paper piece I usually just trim off the extra with scissors at about a 1/4 inch give or take, but this time each seam was trimmed to exactly 1/4 inch and the block was pressed to within an inch of it's life.  Only one seam was just a bit off.  Then I measured the block...it was 9 1/4 inches instead of 9 1/2 inches!!!!!!  #$%@#^&#%^@#$#!!!!

My templates had printed just a hair off - each 4 1/2 inch quadrant printed at 4 3/8 inches.  Augh!!!  I thought about making a different block with the scraps, but there wasn't much left of the background and green fabric - we are talking a 1.5 inch square of the green.  My husband suggested adding a small strip to the middle which I translated into widening the middle.  Actually quite a brilliant idea.

The modified Belted Star on it's way to the fair!
So here is the finished block that I turned in this afternoon.  It doesn't look quite as balanced as the original and two of the corners are off now, but at least it won't be eliminated immediately because it is too small.  I wanted to finish off a mini quilt to enter but it just didn't get done.

So instead, I entered a smocked dress I made years ago for the Emily.  It won grand prize in the Tippecanoe, Indiana County Fair back in the day (yes, it is just as small time as you might think!) and I thought, "Why not enter?"  When I turned it in today they said they don't get very many items in the smocked category anymore so maybe it will stand a fighting chance.

The Fabric and Thread's preview night is August 8th and I will know the results then.  It is rather nice that they have a preview night before the start of the fair - close parking, less crowds.  Hopefully, I will be able to take more time to look at the exhibits and won't have kids tugging on me and wanting to go look at other stuff.  :)  I can't wait!!

Saturday, July 21, 2012

Planning Your Quilt


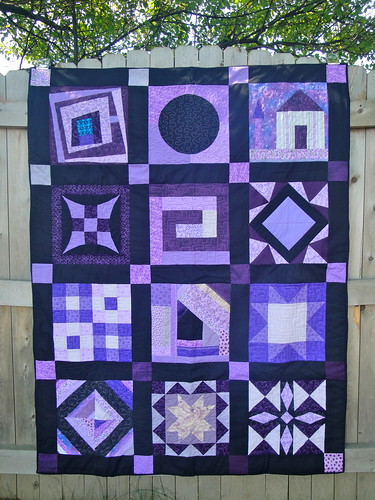
This text heavy post for the We Can Do It! Skill Builder Sampler will discuss how to plan a quilt that will fit your specific bed and some basic tips on how to arrange the sampler blocks.

Planning Quilt Sizes
In real life you would have done this step before or at least during the making of your blocks.  It is what I did when planning the sampler and I will walk you through it now.

The first question to ask yourself is, "what size do I want my quilt to be?"  The answer to this question will differ depending on the quilt's intended use, bed size and personal preference.  If making a quilt for a specific bed it is vital to take the time and measure the bed.  General sizes for quilts are listed many places, but they don't take into account your specific mattress, box spring, bed frame and personal preference for length.

I measured my queen size bed (thin, no box spring) and found that a good length for the quilt would be 87x87 inches square.  I like to add 2 inches to take into account any shrinkage due to washing and quilting so I would make my quilt 89x89 and since that is just a really weird number to work with, I rounded it up to 90 inches square - better a bit too big than too small.


Each of the blocks is 12 inches square finished.  I have 36 blocks which gives me a 6x6 block layout.  If I sewed all my blocks together I would have a 72x72 inch square quilt.  Not large enough.

But, I want to have 2 inches (finished) of sashing between each block and around the perimeter.  (It will give the blocks a nice frame and some breathing room.)  That is 7 rows and columns of sashing at 2 inches (2x7=14) which would give me a 86x86 inch quilt.  We are getting pretty close to the optimal size for the quilt.

But I want to have a border to tie everything together.  If I want my quilt to be 90 inches finished I only have (90-86=4, 4/2=2) enough space for a 2 inch border, which I think would be a bit too narrow and look a bit silly.  I thought about it and figured I have never had a quilt that was too big - the only thing that bugs me is when they are too small for the bed, so I will plan for a 6 inch border on all sides (6x2=12, 86+12=98).  So even though I planned for a 90 inch quilt, as I figured out my layout I ended up with a 98 inch quilt.  That happens sometimes.

Alternatively, I could have taken out some blocks and had a 5x5 block layout.  (5x12=60 inches)
Six rows and columns of sashing (6x2=12).  60+12=72 inches so far.  90-72=18.  I need to add 18 inches to the quilt to bring it to size.  I can do that by adding 9 inch borders on each side and I would have a 90 inch quilt using only 25 of the sampler blocks.  A good option if you didn't make all of the blocks.

Skill Builder Quilt #2

Changing the size of your border is the easiest way to change the size of your quilt.  You can also change the width of your sashing.  "Momma Thomps" used a 3 inch sashing on her quilts that I think looks quite good and is an easy way to add more length and width to your quilt.

However, I have to admit something.  I don't want to make a queen sized quilt anymore.  We recently got another set of bunk beds and I want to make matching quilts for the girls.  Plus, I have some other queen sized quilts in the works (very old WIPs) that I think I would like better on our bed.

So let me run through the planning process again, except for bunk bed sized quilts.  Bunk beds are weird.  They have the protective slats on the sides and no box spring so the width is going to be different than a normal twin sized bed.  I measured the bunk beds and determined that I wanted a 50x74 inch quilt.

Blocks:  a 3x5 layout would give me a 36x60 inch quilt
Sashing:  a 2 inch sashing between each block and around the perimeter would add 8 inches to to width and 12 inches to the length.  That gives me a 42x72 inch quilt.
Border:  To make the quilt my planned 50x74 inches I would need to add a 4 inch border to each side and a one inch border to the top and bottom.  Hummm, I don't know about that - it might look weird.  If I add borders to make it a bit longer it would have more "tuck in" length and the unsymmetrical-ness of it might not bug me as much.  (Have I ever mentioned that I Hate making bunk beds?  Maybe some extra length would help them stay made better.)  For now I will plan on adding a 4 inch border to the top and bottom also, bringing the total quilt size up to 50x80 inches.  Before I add the borders, I will lay the quilt top on the bunk bed to see how it looks and check that I don't need to take away from my planned border size.

Laying Out the Blocks
Before you start cutting sashing and sewing your blocks together it is a good idea to lay all the blocks out and decide what order you want them in.  In most cases, you want the colors and designs spread evenly though out the quilt so it feels balanced and so that there are pops of color and interest through out the quilt.  You may also want to put your favorite blocks near the center of the quilt where they will receive more attention when the quilt is on the bed.

Here are all 36 blocks laid out in random order.  It looks pretty good, but it could use some work.  There are two log cabins right next to each other, a lot of orange on the left, two flowers at the bottom and a bunch of stars grouped in the middle.  Plus, I would like the Compass and Lone Star blocks be closer to the center where they can be seen better.

Most of the trouble spots have been taken care of, but if I was really going to make this quilt, I would probably leave it out for awhile and keep moving the blocks around until I was sure I liked how all of the blocks played together.  As it was, my husband wanted to move the table back so we could have dinner - different priorities I guess  ;)  - so I hurried the process along.

But, as I was planning on dividing the blocks up anyway, so it didn't really matter.  Colleen was drawn to the butterfly and flower blocks, so I pick out those and some reads-as-solid type blocks for her quilt.  I tried to evenly space the solid and more white/applique blocks.

 Aleah really liked the star blocks, so I pulled a bunch of stars for her.  I am still not sure about this layout.  I will probably come back and rearrange it when it is not almost dinner time.  I may have to trade some of Colleen's blocks with Aleah's to make it work.  These just aren't cohesive somehow.

  
 I knew I would have 6 left over blocks and I choose some of my favorites to make a small quilt for Kate's toddler bed.  I love these blocks together!  I hope I don't have to split up this group to "fix" Aleah's star quilt.

So to summarize, the next baby steps in putting the sampler quilt together are:

  1. Measure the bed the quilt will be going on.
  2. Determine sashing and border size based on the size of the quilt desired.
  3. Lay out the blocks to determine a pleasing layout.
  4. Take a picture of the layout and stack and label the blocks by rows. 
Next week we will talk about sashing.  How to determine how much yardage you need, how to cut and how to start sewing it all together.

Thursday, July 19, 2012

Cheaper Than Therapy

 On Saturday we did not end up going to see the bison after all.  The preserve was much farther away than I thought and my husband had to work later than planned.  I was much more disappointed than the children.  I think I am feeling much more emotional lately than normal - I'll blame it on pregnancy hormones for now - and Saturday afternoon I needed a break, some sort of release.

 Completely mindless sewing was that release.  For over an hour I sewed together selvages that I had saved for the last year or two.  I just placed the finished selvage edge over a raw selvage edge and top stitched.  No thinking except to sort by color.

 It was so nice.  I loved being able to dig though the box of selvages and see so many "old friends" from different projects over the last two years.  Right now I plan to make them into a spool quilt kind of like this one - but a different layout.  Anyway, after some mindless sewing I felt much better about life.

 Yesterday, after a frustrating morning, more mindless sewing was in order.  I started with a bunch of 5 inch squares and some gray strips and just started sewing them together, cutting them apart and sewing them back together again.  Then I surrounded the monster I had made in white.  I think it is one of the ugliest things ever.

It looks like a coffin from this angle.  Maybe I'll call it "Death by Quilting."  ;)  The poor unfortunates at QuiltCon are going to receive this as a block submission.

Will it make it into the raffle quilt?  No.
Be featured on the Modern Quilting Blog?  No.
Thrown out?  Yes, if they are wise.  :)

But it helped me relax and feel better after a busy, stressful morning, so it did it's job and that's what is important.

Saturday, July 14, 2012

Delayed by Life...Again...

 This has been a busy week.  We had doctor appointments and then a stressful confrontation between ourselves, our neighbors and the City Council that resulted in our having to get rid of our chickens (grr...) and have made neighbor relations awkward (blah...).  On the bright side we had a fun birthday party for our 12 year old this week and it has finally cooled down a bit here in Iowa which makes for a happy mom. 

I finally felt like I could last more than 10 minutes outside so we went berry picking.  There is nothing better than fresh blueberries and I love to freeze them and have them for snacks all winter.  Yummmm!  Seriously, they are sooo much better than the frozen blueberries in the stores.   I'm glad we were able to get out there this week, because it is almost the end of the blueberry season already.  Spring came early here this year and all the crops are really early.

The only thing that isn't early is my Skill Builder Sampler.  :|  It got shoved to the back of the list by Dr.s, chickens, berries, birthdays and swollen feet.  But I am putting it on the top of my list for next week.  It really is a good thing that I am leading the QAL or else I think the blocks would languish in their box for another year before I put them together.  :)  Posts on layout skills and sashing will be appearing next week.  For real. Really.

But not today because we are going to leave in a bit for Bison Days at the Broken Kettle Grassland Preserve.  The preserve is the largest remaining bit of prairie in Iowa and they are going to be taking people out to see the bison herd today.  Yay!  


How has your summer been going?  I can't believe that we only have a month until school starts again.  ?!?!  We need to do some more swimming!

Thursday, July 12, 2012

More Star Flowers


This week I discovered that if I put my feet up and iced them regularly throughout the day they didn't get nearly as swollen as usual.  Oh, the joys of pregnancy!  On the bright side, this gave me a chance to make quite a few new Star Flowers - I think that is what I am going to call them (unless they have a real name?).

My spacer Flea Market Fancy fabric also came in the mail and I got to work joining them together.  I am not so sure about it.

Here are some more flower stars laid over the fabric.  It just looks like a mushy mess to me.  (And I have no idea why my camera refuses to take crisp pictures of these blocks!  Grrr.)  Or am I just not daring?  Both my husband and daughter suggested white fabric instead of the floral.

So here is a roughly edited picture with white spacer hexagons.

 Solid or dotted turquoise?

 
 Gray?

 Or black?  I think a black and white dot might be the best choice.   What do you think?

Thanks for all of your input on the star flowers and the fair block.  I really, really, really truly appreciate it even if I a total rubbish at responding to comments.  I decided to make the Belted Star block for the fair and it is perfect -- except for one fatal flaw.  I'll unpick it and tell you the whole story soon.  :)

Saturday, July 7, 2012

Putting the Sampler Quilt Together - Part One

I am hoping this series of posts on turning the stack of We Can Do It! Skill Builder Sampler blocks into a quilt will be a resource not just for those who have made the sampler blocks, but others who are looking for more info on making and finishing quilts.

So let's get started!  You have finished all of the blocks in the sampler.  Now what?


Take a Walk Down Memory Lane 
(or Assess and Repair the Damage)  :)
  1. The first step is to gather all of the blocks and give them a good press and starch.  Goodness knows they deserve a bit of TLC after being stored for a year.  :)  
  2. As you press look for stray threads on the back of the blocks and trim them off.
  3. If any parts of the block stick out 1/4 of an inch or more from the main block trim them even or at least within 1/8 of an inch of the main block.
  4. Measure the blocks.  All of the Skill Builder Sampler blocks should measure 12.5 inches.  Sort the blocks.  Put all of the 12.5 inch blocks in one pile.  The 12.5-12.25 inch blocks in another.  The 12.25-12 inch blocks in another and so on.
  5. Count up the blocks in each pile.  There are a couple of different outcomes that may affect how you put together your sampler
Circle of Geese


Outcome 1:
All of your blocks are exactly 12.5 inches.  Great Job!  There should be no problems putting together your sampler.

Outcome 2:  
All of the blocks are 12.25 inches or larger.  Putting the sampler together should still be fairly simple.  We can ease and work around a 1/4 inch shortage.  

Outcome 3:
Most of the blocks are 12.25 inches or larger but a few are smaller.  It is possible in this case to bring the few smaller blocks up to size.  (This was my outcome.  See below for how to bring the blocks up to size.)

Outcome 4:
Half of the blocks are one size and half are another.  You may want to consider making two quilts - one with each size of block.

Outcome 5:
The blocks are of various sizes and you want to put them together in one quilt.  You can make a 'border type' sashing to bring all of the blocks up to the same size.  Vanessa's quilt is an example of this.


Bringing a Few Undersized Blocks Up to Size
The easiest way to bring some of your smaller blocks up to size is to trim the block down down and add a border.

 This is fairly straight forward when dealing with blocks that have no edge points such as this Flowering Snowball block.  Mine is 12 inches square and would be impossible to work in with the other 12.5 inch blocks as is.  However, I can easily trim it down to 10 inches without loosing the overall pattern.


 So, with blocks that will not be harmed by trimming, trim the block down to 10 inches square.  Add 2 inch strips to each side and then the top and bottom.  Trim to 12.5 inches square.

This Minnesota block is a different story.  It is just under 12 inches and if I trimmed it down to 10 inches the points would be cut off and it would look silly.


 It is still possible to work with the pattern of the block.  I could trim it down quite a bit as shown above and add a border, or I could add a narrow border on just two sides to bring it up to size.  Thankfully, this was the only block that had a design that did not lend itself to serious trimming.

If you have a lot of these types of blocks that are under 12.25 inches I would consider either making two quilts with different sized blocks in each, or putting borders on all of the blocks and bringing them up to a standard size (14-16 inches perhaps) as seen in Vanessa's quilt.

Next week we will talk about layout and sashing options.

Monday, July 2, 2012

Going To The Fair!


I have always loved going to the fair.  But I never understood why adults wanted to go and see the exhibits when I was young - wasn't the fair all about the rides?  But now I am all over the exhibits and don't let my kids go on any rides - I know, so mean.  :)  But this year is extra special.   I am going to have a quilt block exhibited in the fair!

2011 Competition Blocks 
Each year there is a quilt block competition at the Iowa State Fair.  They send you fabric and you make a quilt block that is judged.  Then they take all of the blocks and make a quilt for next year's raffle.  Here are the blocks from last year. 

The 2012 Block Fabrics
These are the fabrics that they sent out this year...umm...not my favorites.  I mean, I like good Civil War reproduction fabrics, the poison greens, roses and cheddars, but not these.  But that will just make making a great block that more rewarding/challenging/impossible.  Right?

The only requirements are:
  1. The block must measure 9.5 inches square unfinished (9 inches finished)
  2. The block must contain all 6 fabrics
  3. No additional fabric may be added
  4. The light fabrics aren't so bad - I actually really  like the bumble bees.
    I have added a few more requirements for myself - I would really like to have a shot at winning - I am kind of competitive.  ;)
  1. It must have a decent amount of complexity but not over the top - the winners last year had nice simple yet effective designs with a traditional leaning
  2. All points must match
  3. The back must look good also - I figure when it comes down to the finalists, the judges will pay attention to the back of the blocks because all of the fronts are perfect.
  4. Make sure it is well pressed and has no loose threads
  5. Pay attention to fabric placement - make sure there is good contrast
Has anyone out there judged or seen judging for quilts/quilt blocks before?  Is there anything else I should pay attention to?


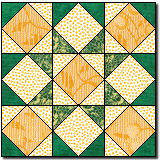
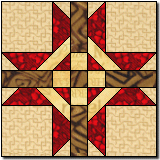
Here are the three blocks I have narrowed it down to (it is really hard to find 9 inch blocks that can use 6 different fabrics!).  L to R:  Aztec Logs, Eight Point Allover and Belted Star.  All of the blocks were found at the Quilter's Cache.

Right now I am leaning towards Aztec Logs because it will be easy to use all of the fabrics, the design fits the fabric and the small 1 inch triangles add a good level of complexity.  As a bonus they are paper pieced, so I have a decent chance of making them accurately.  In fact all of the blocks are paper pieced so hopefully my precision will be better than if I was piecing them with regular cutting/sewing.  But I like the other ones too...

What do you think?